About Me

My photo
I am married and have two beautiful daughters. I have dabbled in numerous different crafts over the years. I haven't done any paper-crafting in a very long time. About 10 years ago I picked up a crochet hook and started a blanket for a friend. Like with many of us life got in the way and the project was moved to a box and never completed. In 2019, I severely broke my ankle and was confined to the couch for around 6 months. I picked my crochet hooks back up and haven't looked back. I still haven't finished that first blanket, but I have completed several others. I have even attempted to write a couple different patterns. So you will see this blog take on a new look as I start posting my crochet projects.

Search This Blog

A Baby Blanket I crocheted

I made this baby blanket for a friend's daughter. She gave it to her at one of her baby showers. This was the first item I have ever bee...

Tuesday, March 30, 2010

My first sympathy card


I usually try to make fun and cheery cards, but the need arose for a sympathy card. Here is my first sympathy card for a friend. I think it turned out pretty good. I hope my friend likes it as well.

Friday, March 26, 2010

A card made with Spellbinders Edgeabilities


I used spellbinders edgeabilites in my cuttlebug and made a card. I colored the roses with copic markers.

Happy Easter


Here is a card I made for my nephew in WY. I like how it turned out. I hope he likes it.

Monday, March 22, 2010

Hang in There


I made this card for my Nephew who feel off a slide and broke his arm. There was a possibility that he was going to need surgery, but thankfully that was not the case. He now has to wear a cast (it's green) for the next 4 weeks.

Updated Card


Here is an updated card I made that I wasn't happy with. Further down the page is the original and as you can see the Happy Easter is barely visible. I was not happy with how it turned out so I wanted to change it so Happy Easter would pop. I think it looks a lot better now. Thanks for looking.

I promise I am not slaking

I just wanted to provide an update as to what has been going on in Cyndi's Craft Corner. I have been busy designing a few projects, making Mother's Day Cards for my mom, my MIL, and my 3 SIL. I have also been very busy making several cards that are currently top secret. After Mother's Day I will have a lot to share with everyone. Until then I will be posting other projects as I get them finished. Hopefully I will have something to post later today or tomorrow. I will also be updating a card I posted earlier and I was not happy with.

Saturday, March 20, 2010

Magic Scratch Paper


While looking through an Oriental Trading Co. catalog I began to wonder if you could use the Magic Scratch Paper in the cricut. For those that don't know the Magic Scratch Paper is a piece of cardstock that is multicolored and then coated with a waxy black film. It is designed for kids. The kids use a stylus and usually a stencil, that is included, to scratch off areas to make the images show through. You can also scratch off your name or random designs. Oriental Trading Co has many different shapes that you can make projects out of.
So while I was looking at the catalog and I saw this paper, I wondered if you could use the cricut to scratch off the images instead of using a stencil. So I bought a kit at Hobby Lobby and decided on an image from the Hannah Montana cartridge. I achieved the design by setting the cricut cutting depth at 1, the speed at 1, and the pressure at 1 so the blade only "kissed" the paper enough to remove the black waxy film. I would only do one image at a time and I would remove the blade after each image to make sure the black film is not hindering the blades movement.
Although I have not tested it yet, I beleive that if I use Glossy Effects over the image it will prevent any further removal of the black film and keep the image intact. I am very pleased with the outcome and plan on using this on a card or two and some layouts for my girls' scrapbooks. Thanks for looking and I hope you will give this a try.
(I wanted to post all the pictures so you could see each area reflect off the flash)

Thinking of You


I made a card using a stamp and coloring it in with copic makers. This is my first time using the markers and I think it turned out pretty good. The markers are very expensive, but they are very nice to work with. Thanks for looking.

Tuesday, March 16, 2010

Beautiful Blog Award


I am a little behind in posting this. Sorry Debbie. I received this beautiful award from Debbie at Wildly Whimsical Crafting Loft.
I was honored to be picked for this lovely award!
I love visiting Debbie's blog. She is a very talented lady and a must stop in the blog world. If you have not visited her site you should go check it out! Thanks Debbie!

The rules for this award are to tell 7 things about myself and then to pass it to 15 bloggers.
Here are my 7 Things
1. I just started making cards in January.
2. I don’t like chocolate plain, it must have something in it or on it.
3. I am a video gamer.
4. I just earned an Associate’s Degree in Medical Office Support.
5. I got a horse for my 16th Birthday (many years ago).
6. I was born in WA and grew up in VA.
7. I love trying new crafts.


My 15 picks in no particular order ~ (click on names to visit their sites)
1. Greenbean at Greenbean's Crafterole
2. Mary at Cardz TV
3. Kathy at Pixie Dust Studio
4. Linda at LilGreenBugville
5. Denise at Paper Pastime
6. Amy Jo at Chocolate Paper Stamps
7. Helen at Crafting Cricut Mom
8. Brandilynn at Created by; Brandilynn
9. Cheryl at Cheryl's Scrapbooking Corner
10. Jamie at Little Miss Crafter
11. Say Anything Crafts at Say Anything Crafts
12. ScrappingJoy at The Joy of Scrapping
13. Britten at Two at a Time Papercraft Designs
14. Jana at I'm Never Bored
15. FawnKreations at FawnKreations

Saturday, March 13, 2010

Birthday Card with a bookmark


Here is a Birthday card that I made that also has a bookmark for the recipent to use. I love how it turned out. The pearls make it pop and the dragonflies are just so cute. Thanks for looking.

Monday, March 8, 2010

Scrapbooking Swarm/Crop

I am gearing up for the scrapbooking swarm/crop on Saturday (13th). I think we have everything ready to go. I am hoping we have a good attendance, but either way it will be a lot of fun. I think as it stands right now we have 7 or 8 confirmed, but some are trying to get friends to attend with them. I also believe we are going to have 4 cricuts on location to people to use.
All I have to do now is get my stuff ready to pack on Saturday morning.
I can't wait. I will see you there.

Wednesday, March 3, 2010

Hoppin easter bunny


This little bunny moves. There is channel behind the grass that allows the bunny to move back and forth.

Happy Birthday Paul


Yesterday was my husband's birthday. Here is the card I made for him.

Tuesday, March 2, 2010

Waterfall Birthday Card


I had so much fun making this card. It was easy to make and the finished card is so cool. Enjoy.

Instructions for Tri-fold card

Instructions for making the Baby’s First Easter Tri-Fold Card

Cut a piece of card stock 5 ½” x 12”
Score long edge at 2”; 4”; 8”; 10”
On short edge of paper align it at 1 ½” then put blade at 2” score mark and cut to 10” score mark
Remove paper and align other short edge at 1 ½” and repeat previous step

Here is an excellent link to a video to help with the folding (also shows how to cut the paper, but I do mine a little different). From Cardz TV

Instead of cutting strips of paper slightly smaller than each section I cut a larger front and back card section.

The front and back panel are cut the same way.

Cut two 5 ¼” x 3 ¾” pieces of patterned paper
With the patterned paper laying on your paper trimmer align the long edge at 2” cut up to 1 ½” also cut from 3 ¾” to 5 ¼” (edge of paper)
With short edge of paper aligned at 1 ½” cut to the 2” mark to remove the corner. Repeat for other corner.

Repeat above steps on second piece of patterned paper.

For the center piece cut the same patterned paper as you used for the front and back panel. I cut mine at 2 ¼” x 3 ¾”.

From a different patterned paper cut two strips at 1 ½” x 8”
Take one strip and cut two 2” long pieces off the strip. You will be left with a 4” x 1 ½” strip.
It is an extra step, but then on each 1 ½” x 2” piece and remove 1/16” for the 1 ½” side and the 2” side.
On the 4” x 1 ½” piece remove 1/16” from the 1 ½” x 4” edges.

Repeat above steps on second strip.

After the trimming you will have four-- 1 7/8” x 1 15/16” pieces
And two-- 1 7/8” x 3 15/16”

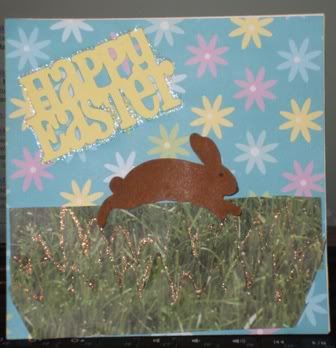
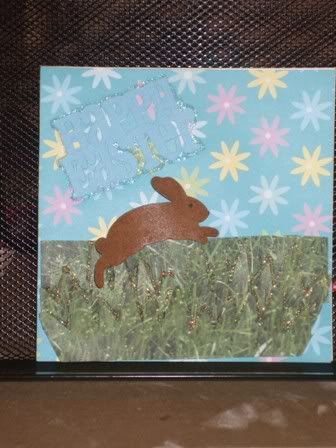
On the Baby's First Easter Card here are the other measurements.
For the White mat I used the Easter cartridge and cut it out at 3”
I forget what I cut the bunny at and for Baby’s First Easter I welded the letters together in Design Studio with the Winter Woodland cart at 1”.

Monday, March 1, 2010

Easter Cards


Here are two easter cards that I have made. One is for my nephew and the other is for my niece. Thanks for looking.